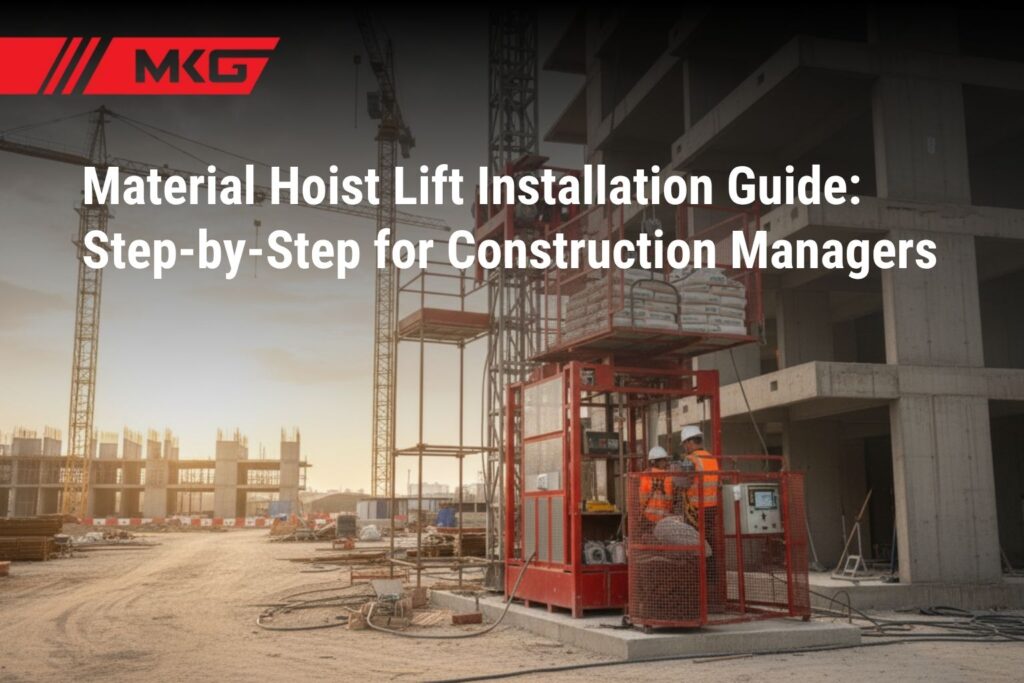
Installing a material hoist lift is a big responsibility. It’s not just about following a checklist; it’s about planning ahead, understanding the equipment and looking after the people who will use it every day. At MKG, we’ve spent more than a decade designing reliable tower and builder hoists that make moving heavy loads easy and safe. In this guide we share our proven installation process, the reasoning behind each step and how it keeps your job site running smoothly.
Why a Proper Installation Matters?
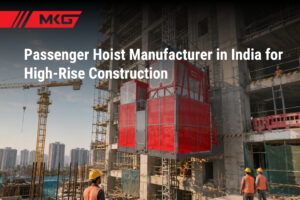
A material hoist is a vertical conveyor that transports sand, bricks, concrete or equipment to upper floors of a building. When it’s installed correctly, the hoist becomes a lifeline for your project. Poor setup, on the other hand, can lead to structural damage, dangerous loads or costly downtime. Ensuring the foundation has adequate strength before installation – for example, verifying it meets the engineer’s design and has reached the required concrete strength – is one of the key elements experts recommend.
Our builder hoists are designed for durability and high loads – the TH‑60 carries up to 500 kg to 60 ft and the TH‑200 handles 1 000 kg to 200 ft. However, even the best machine needs proper support, anchoring and testing to perform safely. The following sections break down each phase of the installation in simple language so that construction managers and site supervisors can follow along.
Step 1 - Pre‑Installation Planning
Understand the Hoist and Its Capacity
The first step is deciding which hoist suits your project. Overhead lifting specialists stress the importance of selecting a hoist that is sized correctly for the expected loads – capacity, lifting speed and duty cycle all need to match your application. The hoist’s rated load (500 kg or 1 000 kg in our case) isn’t there for show; overloading can cause wear, motor failure or catastrophic collapse. Knowing the capacity also helps you choose the right foundation and tie‑in system.
Read the Owner’s Manual and Standards
Every hoist comes with a manufacturer’s manual. Safety experts advise reading the manual thoroughly because it contains specifications, dimensions, inspection criteria and vital operating instructions. Our MKG hoists are delivered with a detailed installation and service manual. Before the equipment arrives, review relevant standards (such as OSHA §1926.552 in the US or BIS codes in India) and make sure your team understands their responsibilities..
Assemble Your Team and Tools
An installation isn’t a one‑person job; it involves engineers, riggers, crane operators and electricians. Ensure everyone has appropriate personal protective equipment (helmets, gloves, high‑visibility vests and safety shoes) and confirm that the tools needed – wrenches, spirit levels, torque spanners, lifting slings and electrical testers – are on site.
Plan the Work Area and Logistics
Choose the hoist position carefully. The foundation must be stable enough to support the machine, the mast and the maximum load. The site should be accessible to trucks delivering the hoist components and there should be enough space around the base for assembly. Plan tie‑in locations on the structure so that the mast can be anchored at intervals specified by the manufacturer – typically every 6–9 m. Arrange for a crane or mobile hoist to lift mast sections into place.
Step 2 - Foundation and Ground Supports
Check Ground Conditions
The foundation is the backbone of the hoist. According to the Hek passenger‑hoist manual, the surface on which the machine stands must be stable and capable of supporting the weight of the machine, mast and load. The foundation should be level, provide adequate drainage and have a load‑bearing capacity of at least 30 psi (2 kgf/cm²). If the soil is weak or the surface is not level, improve it by casting a concrete slab or using steel base plates.
Set Up Ground Supports
Ground supports distribute the hoist’s weight. The manual recommends ground supports that can resist a surface pressure of 285 psi (20 kg/cm²) and provides minimum dimensions for base plates – 0.25 m × 0.25 m for single supports and 1 m × 1 m for larger systems. Ensure supports are level and loaded centrally. Wooden blocks may be placed under the supports to prevent the structure from sliding on concrete or asphalt. Use spirit levels to check both axes of the mast; any misalignment will magnify as height increases.
Provide Electrical and Safety Provisions
Install a power supply close to the hoist to minimize voltage drop. For our TH‑60 and TH‑200 models, three‑phase power or a diesel prime mover is required. Arrange sufficient lighting for assembly work and ensure that access points are fenced off to keep pedestrians away. The professional‑safety article recommends verifying that the electrical disconnect and power are available before work begins. Establish an exclusion zone around the installation area to protect by‑standers.
Step 3 - Assembly of Base and Mast
Position the Base Unit
Place the ground frame in the planned position and set the ground supports under the base. Adjust the supports until the mast is perfectly vertical using a spirit level. This ensures smooth travel of the cage or bucket and prevents uneven wear on rollers and rack gears. Secure the base frame to the foundation with anchor bolts according to engineering drawings.
Attach Subframe and Components
For twin‑cabin configurations, mount the subframe to the base using M20 bolts. Follow the specified bolt grade (e.g., 8.8) and torque requirements – the manual specifies tightening M20×50 bolts to 315 Nm. Place wedges or shims under the base to distribute the load evenly and insert them firmly.
Assemble Mast Sections
Mast erection usually starts from the ground and is built upwards in sections. Lift each section using the site crane or the hoist’s own lifting frame. Secure each mast segment to the previous one using bolts and locking plates. The Hek manual emphasises that before attaching a second cabin (for twin systems), the first anchor should be placed to prevent the unit from tipping due to eccentric loads. Continue adding mast sections, checking vertical alignment at each stage.
Install the Hoist Cage or Bucket
Hoists for materials may use an open bucket or cage. Attach the cage/bucket to the carriage or lifting mechanism as specified. Ensure that the cage is balanced and that guide rollers contact the mast evenly. Secure safety interlocks so that gates cannot be opened when the platform is moving. These safety features prevent door‑open movement, which is a major hazard.
Connect the Drive and Brake System
Our MKG builder hoists use brake motors for controlled lifting. Mount the motor and gearbox on the mast as per the manual and align the drive pinion with the rack. Use new locking plates and follow torque specifications to secure bolts. After mounting, check that the pinion meshes smoothly with the rack and that the brake engages when power is cut. Proper mounting prevents jerky motion and reduces wear on gears.
Step 4 - Electrical and Control Installation
Verify Power Supply
Connect the hoist’s power cables to the designated supply (or diesel unit). Use cables of adequate gauge to handle the current without overheating. If the mains voltage exceeds 460 V, the Hek manual recommends applying a step‑down transformer. Secure all connections against accidental contact and provide a waterproof junction box if the installation is outdoors.
Install Limit Switches and Safety Sensors
Limit switches prevent over‑travel of the cage. During hook‑mount installation, hoists.com recommends verifying that upper and lower limit switches are correctly set. Adjust these switches so the cage stops before hitting the mast top or bottom. Fit overload sensors and, if available, a safe load indicator. Connect intercom systems or alarms to enable communication between the operator and ground crew.
Grounding and Earthing
Ground the hoist frame according to electrical codes to prevent shock hazards. The hoists.com guide notes that proper grounding is crucial in the electrical connection phase. Use earthing rods or connect to the building’s grounding system. Double‑check the continuity of the grounding conductor before energizing the system.
Step 5 - Anchoring the Mast to the Building
Install Tie‑In Brackets
Once the mast reaches a specified height (e.g., every 6 m), anchor it to the building structure. Use tie‑in brackets provided with the hoist and secure them to strong structural members (columns or beams). Structural engineers must verify that the building can withstand the forces transmitted by the hoist. Tighten bolts to the manufacturer’s torque and check alignment.
Check Straightness and Clearances
As the mast climbs, continuously check vertical alignment using plumb lines or laser levels. Uneven mast sections can cause the cage to jam or the rack to bind. Also verify that the hoistway remains clear of scaffolding, balconies or cladding. A clear 750 mm clearance from the platform to surrounding structures is common practice. The material‑hoist operations manual warns against positioning yourself or others under a loaded hoist.
Step 6 - Final Safety Checks and Testing
Conduct Mechanical and Electrical Tests
Before commissioning, perform comprehensive tests. Check the brake system by lifting a load slightly and ensuring it holds without creep. Verify limit switches by raising and lowering the cage until the switches are triggered. Inspect all bolts for tightness and ensure retorquing is scheduled. Conduct no‑load and load‑tests; start with a no‑load run to check smooth operation and control functions then perform a load test at rated capacity or slightly above to verify the structure’s stability. Record the results for future reference.
Train Operators
Operator competence is paramount. Overhead Lifting’s guidelines stress that only trained employees should operate the hoist. Train operators operate on hoist controls, emergency stop procedures, daily inspections and communication protocols. They should always maintain firm footing, tension the hoist before each lift, confirm limit switch function and avoid swinging the load. Provide make‑/model‑specific training and refresher sessions.
Inspect and Inspect Again
Perform a thorough inspection before handing over the hoist to site operations. The professional‑safety article recommends a final pre‑operation walkthrough with all parties. Check hoistway protection, gaps between landing platforms and floor openings, and verify that all safety devices (overspeed governor, door interlocks, fall arresters) are working. Document any issues and correct them before use.
Step 7 - Ongoing Maintenance and Safety Practices
Daily and Weekly Inspections
Once the hoist is in service, inspect it regularly. Our own experience shows that a 10‑minute daily check catches most issues. Look for cracks, loose bolts or rust on the cage and mast, test safety interlocks, inspect cables for cuts or frays and run the hoist without load to listen for unusual noises.
Weekly checks should include lubrication of rack and rollers, tightening of bolts, inspection of wire ropes and testing of limit switches and barricades.
Cleanliness and Corrosion Prevention
Construction sites are dusty and often wet, especially during monsoon seasons. Wipe down the cage, platform and controls daily and perform a deeper clean of mast sections and rollers weekly. Inspect for surface rust monthly and apply protective coatings if paint or galvanization is damaged. Lubricate gears and ropes after cleaning so that grease doesn’t trap dirt. Cover the hoist or provide shelter when it is not in use to prevent water accumulation.
Load Management and Operator Behaviour
Always respect the hoist’s rated load. Distribute the load evenly inside the bucket or cage and avoid overloading. Train operators to use smooth starts and stops, to communicate clearly with ground crew and to adjust operations for harsh environments such as high winds, rain or dust. Never lift or move loads over people, and never use the hoist to lift or transport people – the material‑hoist manual explicitly warns against using a material hoist for people.
Scheduled Preventive Maintenance
Beyond daily inspections, schedule preventive maintenance according to the manufacturer’s recommendations. Replace worn cables, worn rollers and brake pads; check electrical connections for corrosion; and re‑torque bolts as required. Keep a log of inspections and repairs – the material‑hoist manual emphasises the need to inspect all equipment before each use and to report defects. Engage qualified technicians for complex repairs and maintain spare parts on site to minimise downtime.
Conclusion
At MKG, we believe that safety isn’t just a guideline – it’s a commitment we build into every Material Hoist and Tower Hoist. Our equipment is designed, engineered, and manufactured in India to meet international standards while being perfectly suited for Indian construction site conditions.
Whether it’s for high-rise projects, bridge work, or heavy material lifting, MKG’s hoists are built to handle tough conditions – dust, rain, and heavy loads – day after day. Beyond installation, our dedicated service team offers preventive maintenance, safety inspections, and genuine MKG spare parts, ensuring your equipment performs reliably for years.
A properly installed and maintained MKG Material Hoist can serve your construction site efficiently for 20–30 years, providing a high return on investment and long-term peace of mind.
Talk to MKG’s technical experts today to schedule your next site inspection or get guidance on proper hoist installation and maintenance practices.
Email: info@mkgworld.in
Call:+91 9522239320 – Let’s make your construction sites safer, faster, and smarter with MKG hoists.
Frequently Asked Questions
1. What’s the ideal load capacity for a construction material hoist?
The ideal capacity depends on your site requirements, but most mid- to high-rise construction projects use hoists that handle 500 kg to 2,000 kg per lift. Choosing a higher-capacity model helps reduce lifting cycles and improves project efficiency. MKG’s material hoists are available in multiple configurations to suit both medium and large-scale construction needs.
2. How often should material hoist components be inspected?
A daily visual inspection before operation is essential, followed by a comprehensive monthly check covering structural bolts, cables, brakes, and limit switches. Regular third-party safety audits every 6–12 months ensure compliance with site safety norms and BIS/ISO standards.
3. Can a single hoist installation serve multiple building blocks?
Technically, it can, but it’s not advisable unless designed for that purpose. A single hoist serving multiple structures can lead to increased wear and uneven load distribution. Instead, each tower should ideally have its own dedicated hoist setup for consistent performance and safety compliance.
4. What kind of power supply is required for running a material hoist?
Material hoists generally require a 3-phase power connection (415V) for smooth motor operation. Using the correct voltage and earthing setup prevents electrical overload and ensures steady lifting performance under continuous load cycles.
5. How can I extend the lifespan of my material hoist?
Simple measures such as lubricating gear parts, avoiding overloading, maintaining a clean mast section, and storing the hoist under covered conditions during downtime can extend its service life by several years. Using only genuine MKG spare parts also prevents premature wear and mechanical failure.